Sunday, December 23, 2012

just in a minute, Christmas Snack

Well..the kids call them "The Chips'ie Hats".

Made it for my son's christmas party at school, and this was instant hit. Back home, he was really excited. saying.."Mamma....everyone wanted my snack only, you know ! "


This item is on my Christmas Snack sale list .But as it was the most liked ..thought, well...would just share its making as well.


All that you need :

Hat shaped chips
White melting chocolate
M&M's (red and green)

..nothing much actually...just this.


How to:
Melt the white chocolate in M/W on 70 % power , 20 seconds at a time. Stir well in between and continue heating, till the whole blocks are melted. Make sure that the bowls , spoons used are perfectly dry with adsolutely no mositure content.

If chocolate comes into contact with even the tiniest amount of water while melting, it will suddenly "seize," or turn hard and grainy. A single drop of water or a whiff of steam can trigger particles in it to solidify into a dull mass.


1. Bip the hat shaped chips into the melted chocolate just at its outer rim.


Select red and green coloured M&M's and insert one into the chips.


Once the chocolate sets, it will hold the M&M in place.
 

Store in air tight containers.  A simple, cute snack ready just in less than a minute.

The only negative side it that, the kids once having this..will definitely ask for more and doing in large scale, well...this is definitely  time consuming.


Anyways, a happy smile on the younger one's faces is all worth the efforts, is it not.

A normal drink, the X'mas way...


Well...there is not much content in this post, even to write down. Two juices, served together with the seasonal festive colour theme.


I have taken - Kiwi and Lime Juice for the green colour, and Strawberry juice, filled in star shaped ice moulds and made to set.

Treat your guests to some simple welcome drink ..but...with style.


  Add in the red star shaped juice ice-block just before serving.

                                                                       
                                                                           Cheers !!!

....also check out on a spicier treat, the Minty Kubus Christmas tree snack that was posted way back.

below is the link.
                              
                          http://ieatonline.blogspot.com/2012/01/kuboos-chutney-christmas-trees.html

Wednesday, December 5, 2012

Edible Pizza-Wreath

Christmas is very much round the corner, so what's more apt than something really simple but highly appreciated by kids and guests alike.

Pizza wreaths !


I am sharing the long cut and the short cut means to get it done. But, whatever be the way....the process is really simple.

For the pizza,

Roll the dough (recipe link here) into a circular shape and cut off a smaller circle form the centre.


Apply pizza sauce, top with shredded cheese and any toppings of our choice - chicken, sausages, diced peppers, olives.

I have layered the cheese and then the veggies on top, so that once baked the sausages and the peppers will be visible.
  

Pre-heat the oven to 180 deg C and baked till the cheese is melted and slightly brown.


..and just to share, this is the image of others foodies made form the very same dough. This was my very first attempt at making fatayers, and the challah...very much evident from the zig-zag pleating. But, its the first try..so i had my excuse.. I use the word "had", coz this was clicked about 3 years back. Was on a baking spree then and tried all that i could with the very same batch of the dough -  chicken mini pizzas, zatar and labneh fatayer, cinamon jam roll, cheese buns and plain challah bread.

So, keep this dough recipe. Its very handy. You can take my word.

And...back to our wreath...now, for the even easy short cut .
Well...i would always suggest that you keep a pack or two of frozen pizza in your freezer especially during christmas time. Just in case you have some unexpected guests...or...ur kid's friends coming over...then, this is the most quickest thing to make.

Defrost and bake as per package instructions, but just dont forget to cut off the centre from the pizza !!


Have a good day and a great Christmas with these edible wreaths !

Sunday, September 9, 2012

Healthy Beetroot Brownies - eggless, butterless, flourless

Just like an advert would say for a matrimonial site....someone (something in this context)...somewhere .... is definitely  made for you. Need to wait though, till the right time for the right things to meet. And thats when, you can finally look back at it, smile and say..." and now! that looks jussst the way i wanted it to be!

Had prepared these bronwies sometime back for my food promotional page on facebook, but was absolutely blank on how to do a proper presentation . All that i could think of was just cutting it into chunks, lay on a paper doily and click.


Months later, while doing our regular household shopping, came across this package of mini wafer cups and straight it came into custody. But again, with no specific intensions at the moment. The next day, had to prepare dinner for a couple of my husbands' friends and for the dessert...well..that thats when things started taking shape.

Brownies and ice-cream ... great combo. And in cute little wafer cups decorated with choco sprinkles and chips!..not to forget that it is not the regular bownies, rather the super - healthy alternative loaded with loads of beetroot .

 Perfect individual sized mini dessert.

Off to the recipe:

You need:

Whole wheat flour - 1 1/2 cups
Cane sugar            - 1 1/2 cup
Beets                    - 3 medium, grated
Cocoa                  - 2 tbsp
Vanilla essence     - 1 tsp
Yogurt                 - 1 cup
Baking powder     - 1 tsp
Baking soda          - 1 tsp
Mixed nute, raisins - 1/4 cup
Oil                        - 1/3 cup
Salt

How to:

Wash, peel and grate fine the beetroots . Keep aside.

Sift the whole wheat. Add salt, cocoa and set aside.


Mix the yogurt with cane sugar, baking soda, baking powder and keep aside to froth.


Slowly add the yogurt mix and blend well. Then add the oil and vanilla essence.
Fold in the grated beets and finally add in the mixed nuts and raisins.


Pre-heat oven to 350 deg F and line a baking pan with parchment paper and grease the sides with oil or butter.
Pour into the greased pan and garnish with the nuts. Bake for 40-45 mins or till the tooth pick comes out clean.
Cool on wire rack and cut into squares. 

Note : The cocoa adds in a great chocolatey flavour to the brownies, absolutely camouflaging the beets.

To serve:
Thaw the ice-cream (any flavour) to a flowing consistency.


Scoop in a spoonfull or two into the wafter cups, insert a brownie square and top again with ice-cream just to fill.


Line the edges with choco sprinkles, and a choco chip in the centre.

 The platter ready to be served to the guests.


....ooh...well....when you say its " tried and tested."...the dessert freak in me gets the very first bite :-).

Recipe adapted from here, with slight alterations.

Saturday, August 18, 2012

Weekend "vaayanottam"

Disclaimer – this is definitely not a post that you would expect to see in a cookery blog, but just jotting down some knick knacks of a lazy weekend afternoon timepass.  

Friday afternoon lunch is always “hot” straight from the pan, a once a week luxury for “hubbie-bie” who for the rest of the days take it tiffined off to work.  Fish is an almost staple part of our plate, but most days its grilled, but ..come friday….well….u definitely need a break.
à´Žà´£്ണയിà´²്‍ വറുà´¤്à´¤ à´šൂà´Ÿà´¨്‍ à´®ീà´¨ിà´¨്à´Ÿെ à´µാà´²െ à´•െà´Ÿ്à´Ÿാà´¨്‍ à´•ൊà´³്à´³ുà´µോ grill à´…à´Ÿിà´š്à´šà´¤ിà´¨് ?
That Friday morning was exceptionally relaxed..nothing much to do….(and that’s when you land up doing the most craziest of things. ..very much an occassional “jobless” mom). Kids were just busy as usual with their bikes and cars, dashing through the lobby and the hallway. He had brought in some fresh fish that morning , so its definitely “fry-time”.

With four men at home aged 35 plus (the dad), 7 , 4 and 3minus, the "fish" menu goes like :


*    Spicy, bony ...whatever...as long as it is fresh and sizzling hot (definitely for the father, and mommy too)
*    Spicy, but boneless ...for big B
*    Spiceless, boneless for the younger two.


à´®ീà´¨്‍ വറുà´•ുà´¨്à´¨ മണം à´…à´Ÿിà´š്à´šിà´Ÿ്à´Ÿാà´•ും ആശാà´¨് ഇരിà´ª്à´ª് ഉറകകുà´¨ിà´²്à´². ആഴ്à´š à´’à´¨്à´¨് à´•à´´ിà´ž്à´žു à´µീà´Ÿ്à´Ÿിà´²്‍ à´®ീà´¨്‍ ഇന്à´Ÿെ stock à´¤ീà´°്à´¨ിà´Ÿ്à´Ÿ്.  so, à´’à´°ു gap ഇന് à´¶േà´·ം à´•à´´ിà´•ുà´®്à´ªോà´³്‍ à´Žà´¨്à´¤ിà´¨ും à´¸്à´µാà´¦് à´•ൂà´Ÿുതല്‍ ആയിà´°ിà´•്à´•ും .
സമയം à´’à´°ു മണി ആയി. à´†à´¶ാà´¨്‍  kitchen ഇല്‍ à´µà´¨്à´¨ു seat à´ªിà´Ÿിà´š്à´šു . 
dH - “നല്à´² à´šൂà´Ÿ് à´šോà´±ും ...... à´šൂà´Ÿ് à´®ീà´¨്‍ വറുà´¤്തതും à´ªോà´°à´Ÿ്à´Ÿെ.... à´ªോà´°à´Ÿ്à´Ÿേ....."

à´­ാà´°്à´¯  - "à´®ീà´¨്‍ വറുà´¤്à´¤ു à´•à´´ിà´ž്à´žു. പക്à´·േ à´•à´´ിà´•്à´•ാà´¨്‍ à´•ുറച്à´šു wait à´šെà´¯േà´£്à´Ÿി വരും .
dH – à´¹ോ...photo session ആയിà´°ിà´•്à´•ും . à´ªുà´³്à´³ി à´•ൊà´¤ി à´…à´Ÿà´•്à´•ി à´¤ിà´°ിà´š്à´šു à´ªോà´¯ി..... back to the living room, browsing the sports and news channels on tv all at once.
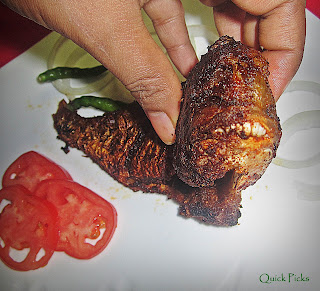
He knew exactly what I had in mind. Had made this fish fry some time back, but just left the head on ..and God! It was the most weirdest thing I had ever seen.
  
 By the time its fully fried, its teeths would have all protruded out. Somehow, I couldn’t take some snaps that time, so was definitely waiting for the next time for this same fish to be brought home . And this time, yes….so, definitely was not gonna lose this chance to click before it was all bones.


                                                gheeeeekkksss !!!


à´•ുറച്à´š് à´•à´´ിà´ž്à´žà´ª്à´ªോà´³്‍  à´µീà´£്à´Ÿും à´µിà´³ി à´•േà´Ÿ്à´Ÿു ..."à´…à´¤േ ....മണി à´’à´¨്നര ആയി !"...à´µിശപിà´¨്à´Ÿെ à´µിà´³ി

 Off goes the plate, straight to the dining table….but with teeth , or no teeth…in minutes..it was in this shape.

It does make me wonder, if ever this fish could think WHILE it was being fried (yeah, that’s what I said before ,  when there isn’t much to do, you start thinking the wildest) what would have been its thoughts ??
Would it have been in the lines  of…
"ഈശ്വരാ ...à´Žà´£്ണയിà´²്‍ à´‡à´Ÿ്à´Ÿà´ª്à´ªോà´³്‍ à´¤ുà´Ÿà´™്à´™ിയതാ à´µാà´¯ിà´²ോà´Ÿ്à´Ÿ് à´¨ോà´•ിà´¯ുà´³്à´³ à´ˆ comment à´…à´Ÿി . ഇങ്ങനെ à´¯ുà´£്à´Ÿോ à´’à´°ു "à´µായനോà´•്à´•ി " à´ªെà´£്à´£് .... 

Yours truly....

Wednesday, August 8, 2012

Cup cake = "cake in a cup" dessert ; the best leftover remake

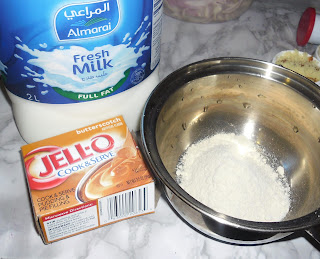
Had a half used pack of Jello cook & serve pudding  - butterscotch flavour and some leftover whipped cream and there was not much that you could do with it anyway....and thats when this remake theme was born.  Got some left over cakes as well ?? Perfect! Time for some chaai-cake dessert, or whatever you need to name.


I have here used these small sized arabic tea cups.  

Layer a slice of cake in the cup.


Scoop in some whipped cream.

Top with an other layer of cake

Prepare the pudding mix as per package instructions . The Jello butterscotch flavour is not instant mix, rather its the normal cooking type. It needs to be cooked the same way that you do with the regular custard powder - mixing with milk and cooking over low flame.


The next part is pipping it over the cake in the tea cup.  To get the real "chaai" effect, alternate between  scoops of whipped cream and the pudding mix into the piping tube and pipe swirls over the cake.


The "chaai" cake treat is ready to be devoured.

Friday, June 1, 2012

3 in 1 post : The Red Pulav, done the pressure cooker way with a quick side starter and spicy Pepper Chicken

Am I not really greateful to a dear friend of ours, a great cook by herself, who shared this great tip in making pulav in the pressure cooker. Its really easy, time saving, and the rice...they come out really well. Trust me!

Here, I have got the "beetroot & carrot pulav" which is by itself loaded with all the goodness of the veggies and has a great colour too. So moms, if your kids are not much into eating vegetables, get them this rice meal and sure, they will like it.

A quick starter pick, with baby tomatoes and cucumber..and...hot hot kerala style pepper chicken.


The Red Rice Pulav

You need :

Carrot - 1 big, grated
Beetroot - 1 big, grated
Spices (cloves, cumin, peppercones, bay leaves, cardamom) - few
Onion - 1 medium sized, cut small
Garlic - 3 , sliced small
Basmati rice - 3 cups, soaked in water for atleast an hour.
"BOILED" Water - 1.5 cups for each cup of rice


How to :

Add 2 tbs of olive oil in the pressure cooker and saute the garlic, onions and the spices.
Add the grated beets and carrot and cook till tender.
In the meanwhile, boil the required quanitity of water (here, 3*1.5 cups) and pour the "boiled water" into the pressure cooker once the veggies are done.
Now add in the rice, salt and a spoon of butter/margarine.
Close the pressure cooker and once the steam starts to pass through the nossle in a full straight path, put on the whistle and close the cooker.

Now this is the key - Adding in the rice to hot boiled water ..and....putting down the whistle while steam passes straight up. Let the cooker stay on the stove, (turned off) for about 30 minutes. The pulav will be done by then.

 It has a great colour, is healthy and tastes great too. You can do it with just carrot or beetroot alone. The carrot rice will be more orangish in shade and the one with beetroot alone gives a lovely purple colour. Sure the kids are gonna love it.


..and for the sides....there's this very quick tomato n cucumber starter picks and spicy pepper chicken done the kerala style.

Baby Tomato & Cucumber Picks with Chillie-Barbaque sauce dip


You need:
Baby tomatoes - red and yellow coloured ones - 6 each
Small sized cucumber - 2
Tooth picks

For the sauce - you need -
Barbaque sauce - 3 tbsp
Hot and sweet chillie sauce - 2 tbsp
Dried rosemary
Paprika powder - a pinch

Mint leaves - to decorate


How to

Cut the baby tomatoes into half.
Cut the cucumber crosswise about 1 cm thick and insert a slice in between the cut tomato as shown.
Join together using a toothpick.
Decorate with a mint leaf .

For the sauce, just mix all the ingredients together, and serve aside the tomato picks.

A quick starter in just a minute.


want something really hot and spicy ??
The kerala style pepper chicken really makes up for the mild and suttle flavour of the red Rice pulav.

You need:
Chicken, cut to medium size pieces - 2 kg

To marinate
4 to 5 tsp - Pepper chicken masala (available in Indian supermarkets)
Ginger garlic paste - 1 tbsp
Salt to taste

Other ingredients
Onions , chopped - 3 cups
Pepper chicken masala - 3 tbsp
Chille powder, Coriander powder - 2-3 tsp
Turmeric powder - 1 tsp
Black pepper powder - 1-2 tbsp
Green chilies, chopped - 4-5
Ginger - 1 inch piece
Garlic - 6-7 cloves
4 to 5 sprigs - Curry leaves
How to prepare Kerala Pepper chicken

Marinate chicken for 30 mins in a marinade made with mixing the said ingredients with little water ,ensure that chicken pieces get well covered in all sides with the marinade mixture.

How to :

Heat a pan & put marinated chicken into the pan ,no need to add water ,close with a lide & cook ,as chicken will leave water it will get cooked in that water ,cook till chicken turns tender ,drain the water from the cooked chicken & keep aside the chicken pieces .

Take another pan & heat oil.
When the oil is hot add in mustard seeds, ginger, garlic, green chillie, and chopped onions.
Fry till it turn brown, add the masalas and stir on low flame till the raw smells leaves and oil separates.
Now add the cooked chicken pieces , pepper powder and  mix well with the masala . Once the gravy is well blended,
Remove from heat & off the stove .
Garnish this black pepper chicken with coriander leaves.


Enjoy  !!!

Sunday, December 23, 2012

just in a minute, Christmas Snack

Well..the kids call them "The Chips'ie Hats".

Made it for my son's christmas party at school, and this was instant hit. Back home, he was really excited. saying.."Mamma....everyone wanted my snack only, you know ! "


This item is on my Christmas Snack sale list .But as it was the most liked ..thought, well...would just share its making as well.


All that you need :

Hat shaped chips
White melting chocolate
M&M's (red and green)

..nothing much actually...just this.


How to:
Melt the white chocolate in M/W on 70 % power , 20 seconds at a time. Stir well in between and continue heating, till the whole blocks are melted. Make sure that the bowls , spoons used are perfectly dry with adsolutely no mositure content.

If chocolate comes into contact with even the tiniest amount of water while melting, it will suddenly "seize," or turn hard and grainy. A single drop of water or a whiff of steam can trigger particles in it to solidify into a dull mass.


1. Bip the hat shaped chips into the melted chocolate just at its outer rim.


Select red and green coloured M&M's and insert one into the chips.


Once the chocolate sets, it will hold the M&M in place.
 

Store in air tight containers.  A simple, cute snack ready just in less than a minute.

The only negative side it that, the kids once having this..will definitely ask for more and doing in large scale, well...this is definitely  time consuming.


Anyways, a happy smile on the younger one's faces is all worth the efforts, is it not.

A normal drink, the X'mas way...


Well...there is not much content in this post, even to write down. Two juices, served together with the seasonal festive colour theme.


I have taken - Kiwi and Lime Juice for the green colour, and Strawberry juice, filled in star shaped ice moulds and made to set.

Treat your guests to some simple welcome drink ..but...with style.


  Add in the red star shaped juice ice-block just before serving.

                                                                       
                                                                           Cheers !!!

....also check out on a spicier treat, the Minty Kubus Christmas tree snack that was posted way back.

below is the link.
                              
                          http://ieatonline.blogspot.com/2012/01/kuboos-chutney-christmas-trees.html

Wednesday, December 5, 2012

Edible Pizza-Wreath

Christmas is very much round the corner, so what's more apt than something really simple but highly appreciated by kids and guests alike.

Pizza wreaths !


I am sharing the long cut and the short cut means to get it done. But, whatever be the way....the process is really simple.

For the pizza,

Roll the dough (recipe link here) into a circular shape and cut off a smaller circle form the centre.


Apply pizza sauce, top with shredded cheese and any toppings of our choice - chicken, sausages, diced peppers, olives.

I have layered the cheese and then the veggies on top, so that once baked the sausages and the peppers will be visible.
  

Pre-heat the oven to 180 deg C and baked till the cheese is melted and slightly brown.


..and just to share, this is the image of others foodies made form the very same dough. This was my very first attempt at making fatayers, and the challah...very much evident from the zig-zag pleating. But, its the first try..so i had my excuse.. I use the word "had", coz this was clicked about 3 years back. Was on a baking spree then and tried all that i could with the very same batch of the dough -  chicken mini pizzas, zatar and labneh fatayer, cinamon jam roll, cheese buns and plain challah bread.

So, keep this dough recipe. Its very handy. You can take my word.

And...back to our wreath...now, for the even easy short cut .
Well...i would always suggest that you keep a pack or two of frozen pizza in your freezer especially during christmas time. Just in case you have some unexpected guests...or...ur kid's friends coming over...then, this is the most quickest thing to make.

Defrost and bake as per package instructions, but just dont forget to cut off the centre from the pizza !!


Have a good day and a great Christmas with these edible wreaths !

Sunday, September 9, 2012

Healthy Beetroot Brownies - eggless, butterless, flourless

Just like an advert would say for a matrimonial site....someone (something in this context)...somewhere .... is definitely  made for you. Need to wait though, till the right time for the right things to meet. And thats when, you can finally look back at it, smile and say..." and now! that looks jussst the way i wanted it to be!

Had prepared these bronwies sometime back for my food promotional page on facebook, but was absolutely blank on how to do a proper presentation . All that i could think of was just cutting it into chunks, lay on a paper doily and click.


Months later, while doing our regular household shopping, came across this package of mini wafer cups and straight it came into custody. But again, with no specific intensions at the moment. The next day, had to prepare dinner for a couple of my husbands' friends and for the dessert...well..that thats when things started taking shape.

Brownies and ice-cream ... great combo. And in cute little wafer cups decorated with choco sprinkles and chips!..not to forget that it is not the regular bownies, rather the super - healthy alternative loaded with loads of beetroot .

 Perfect individual sized mini dessert.

Off to the recipe:

You need:

Whole wheat flour - 1 1/2 cups
Cane sugar            - 1 1/2 cup
Beets                    - 3 medium, grated
Cocoa                  - 2 tbsp
Vanilla essence     - 1 tsp
Yogurt                 - 1 cup
Baking powder     - 1 tsp
Baking soda          - 1 tsp
Mixed nute, raisins - 1/4 cup
Oil                        - 1/3 cup
Salt

How to:

Wash, peel and grate fine the beetroots . Keep aside.

Sift the whole wheat. Add salt, cocoa and set aside.


Mix the yogurt with cane sugar, baking soda, baking powder and keep aside to froth.


Slowly add the yogurt mix and blend well. Then add the oil and vanilla essence.
Fold in the grated beets and finally add in the mixed nuts and raisins.


Pre-heat oven to 350 deg F and line a baking pan with parchment paper and grease the sides with oil or butter.
Pour into the greased pan and garnish with the nuts. Bake for 40-45 mins or till the tooth pick comes out clean.
Cool on wire rack and cut into squares. 

Note : The cocoa adds in a great chocolatey flavour to the brownies, absolutely camouflaging the beets.

To serve:
Thaw the ice-cream (any flavour) to a flowing consistency.


Scoop in a spoonfull or two into the wafter cups, insert a brownie square and top again with ice-cream just to fill.


Line the edges with choco sprinkles, and a choco chip in the centre.

 The platter ready to be served to the guests.


....ooh...well....when you say its " tried and tested."...the dessert freak in me gets the very first bite :-).

Recipe adapted from here, with slight alterations.

Saturday, August 18, 2012

Weekend "vaayanottam"

Disclaimer – this is definitely not a post that you would expect to see in a cookery blog, but just jotting down some knick knacks of a lazy weekend afternoon timepass.  

Friday afternoon lunch is always “hot” straight from the pan, a once a week luxury for “hubbie-bie” who for the rest of the days take it tiffined off to work.  Fish is an almost staple part of our plate, but most days its grilled, but ..come friday….well….u definitely need a break.
à´Žà´£്ണയിà´²്‍ വറുà´¤്à´¤ à´šൂà´Ÿà´¨്‍ à´®ീà´¨ിà´¨്à´Ÿെ à´µാà´²െ à´•െà´Ÿ്à´Ÿാà´¨്‍ à´•ൊà´³്à´³ുà´µോ grill à´…à´Ÿിà´š്à´šà´¤ിà´¨് ?
That Friday morning was exceptionally relaxed..nothing much to do….(and that’s when you land up doing the most craziest of things. ..very much an occassional “jobless” mom). Kids were just busy as usual with their bikes and cars, dashing through the lobby and the hallway. He had brought in some fresh fish that morning , so its definitely “fry-time”.

With four men at home aged 35 plus (the dad), 7 , 4 and 3minus, the "fish" menu goes like :


*    Spicy, bony ...whatever...as long as it is fresh and sizzling hot (definitely for the father, and mommy too)
*    Spicy, but boneless ...for big B
*    Spiceless, boneless for the younger two.


à´®ീà´¨്‍ വറുà´•ുà´¨്à´¨ മണം à´…à´Ÿിà´š്à´šിà´Ÿ്à´Ÿാà´•ും ആശാà´¨് ഇരിà´ª്à´ª് ഉറകകുà´¨ിà´²്à´². ആഴ്à´š à´’à´¨്à´¨് à´•à´´ിà´ž്à´žു à´µീà´Ÿ്à´Ÿിà´²്‍ à´®ീà´¨്‍ ഇന്à´Ÿെ stock à´¤ീà´°്à´¨ിà´Ÿ്à´Ÿ്.  so, à´’à´°ു gap ഇന് à´¶േà´·ം à´•à´´ിà´•ുà´®്à´ªോà´³്‍ à´Žà´¨്à´¤ിà´¨ും à´¸്à´µാà´¦് à´•ൂà´Ÿുതല്‍ ആയിà´°ിà´•്à´•ും .
സമയം à´’à´°ു മണി ആയി. à´†à´¶ാà´¨്‍  kitchen ഇല്‍ à´µà´¨്à´¨ു seat à´ªിà´Ÿിà´š്à´šു . 
dH - “നല്à´² à´šൂà´Ÿ് à´šോà´±ും ...... à´šൂà´Ÿ് à´®ീà´¨്‍ വറുà´¤്തതും à´ªോà´°à´Ÿ്à´Ÿെ.... à´ªോà´°à´Ÿ്à´Ÿേ....."

à´­ാà´°്à´¯  - "à´®ീà´¨്‍ വറുà´¤്à´¤ു à´•à´´ിà´ž്à´žു. പക്à´·േ à´•à´´ിà´•്à´•ാà´¨്‍ à´•ുറച്à´šു wait à´šെà´¯േà´£്à´Ÿി വരും .
dH – à´¹ോ...photo session ആയിà´°ിà´•്à´•ും . à´ªുà´³്à´³ി à´•ൊà´¤ി à´…à´Ÿà´•്à´•ി à´¤ിà´°ിà´š്à´šു à´ªോà´¯ി..... back to the living room, browsing the sports and news channels on tv all at once.
He knew exactly what I had in mind. Had made this fish fry some time back, but just left the head on ..and God! It was the most weirdest thing I had ever seen.
  
 By the time its fully fried, its teeths would have all protruded out. Somehow, I couldn’t take some snaps that time, so was definitely waiting for the next time for this same fish to be brought home . And this time, yes….so, definitely was not gonna lose this chance to click before it was all bones.


                                                gheeeeekkksss !!!


à´•ുറച്à´š് à´•à´´ിà´ž്à´žà´ª്à´ªോà´³്‍  à´µീà´£്à´Ÿും à´µിà´³ി à´•േà´Ÿ്à´Ÿു ..."à´…à´¤േ ....മണി à´’à´¨്നര ആയി !"...à´µിശപിà´¨്à´Ÿെ à´µിà´³ി

 Off goes the plate, straight to the dining table….but with teeth , or no teeth…in minutes..it was in this shape.

It does make me wonder, if ever this fish could think WHILE it was being fried (yeah, that’s what I said before ,  when there isn’t much to do, you start thinking the wildest) what would have been its thoughts ??
Would it have been in the lines  of…
"ഈശ്വരാ ...à´Žà´£്ണയിà´²്‍ à´‡à´Ÿ്à´Ÿà´ª്à´ªോà´³്‍ à´¤ുà´Ÿà´™്à´™ിയതാ à´µാà´¯ിà´²ോà´Ÿ്à´Ÿ് à´¨ോà´•ിà´¯ുà´³്à´³ à´ˆ comment à´…à´Ÿി . ഇങ്ങനെ à´¯ുà´£്à´Ÿോ à´’à´°ു "à´µായനോà´•്à´•ി " à´ªെà´£്à´£് .... 

Yours truly....

Wednesday, August 8, 2012

Cup cake = "cake in a cup" dessert ; the best leftover remake

Had a half used pack of Jello cook & serve pudding  - butterscotch flavour and some leftover whipped cream and there was not much that you could do with it anyway....and thats when this remake theme was born.  Got some left over cakes as well ?? Perfect! Time for some chaai-cake dessert, or whatever you need to name.


I have here used these small sized arabic tea cups.  

Layer a slice of cake in the cup.


Scoop in some whipped cream.

Top with an other layer of cake

Prepare the pudding mix as per package instructions . The Jello butterscotch flavour is not instant mix, rather its the normal cooking type. It needs to be cooked the same way that you do with the regular custard powder - mixing with milk and cooking over low flame.


The next part is pipping it over the cake in the tea cup.  To get the real "chaai" effect, alternate between  scoops of whipped cream and the pudding mix into the piping tube and pipe swirls over the cake.


The "chaai" cake treat is ready to be devoured.

Friday, June 1, 2012

3 in 1 post : The Red Pulav, done the pressure cooker way with a quick side starter and spicy Pepper Chicken

Am I not really greateful to a dear friend of ours, a great cook by herself, who shared this great tip in making pulav in the pressure cooker. Its really easy, time saving, and the rice...they come out really well. Trust me!

Here, I have got the "beetroot & carrot pulav" which is by itself loaded with all the goodness of the veggies and has a great colour too. So moms, if your kids are not much into eating vegetables, get them this rice meal and sure, they will like it.

A quick starter pick, with baby tomatoes and cucumber..and...hot hot kerala style pepper chicken.


The Red Rice Pulav

You need :

Carrot - 1 big, grated
Beetroot - 1 big, grated
Spices (cloves, cumin, peppercones, bay leaves, cardamom) - few
Onion - 1 medium sized, cut small
Garlic - 3 , sliced small
Basmati rice - 3 cups, soaked in water for atleast an hour.
"BOILED" Water - 1.5 cups for each cup of rice


How to :

Add 2 tbs of olive oil in the pressure cooker and saute the garlic, onions and the spices.
Add the grated beets and carrot and cook till tender.
In the meanwhile, boil the required quanitity of water (here, 3*1.5 cups) and pour the "boiled water" into the pressure cooker once the veggies are done.
Now add in the rice, salt and a spoon of butter/margarine.
Close the pressure cooker and once the steam starts to pass through the nossle in a full straight path, put on the whistle and close the cooker.

Now this is the key - Adding in the rice to hot boiled water ..and....putting down the whistle while steam passes straight up. Let the cooker stay on the stove, (turned off) for about 30 minutes. The pulav will be done by then.

 It has a great colour, is healthy and tastes great too. You can do it with just carrot or beetroot alone. The carrot rice will be more orangish in shade and the one with beetroot alone gives a lovely purple colour. Sure the kids are gonna love it.


..and for the sides....there's this very quick tomato n cucumber starter picks and spicy pepper chicken done the kerala style.

Baby Tomato & Cucumber Picks with Chillie-Barbaque sauce dip


You need:
Baby tomatoes - red and yellow coloured ones - 6 each
Small sized cucumber - 2
Tooth picks

For the sauce - you need -
Barbaque sauce - 3 tbsp
Hot and sweet chillie sauce - 2 tbsp
Dried rosemary
Paprika powder - a pinch

Mint leaves - to decorate


How to

Cut the baby tomatoes into half.
Cut the cucumber crosswise about 1 cm thick and insert a slice in between the cut tomato as shown.
Join together using a toothpick.
Decorate with a mint leaf .

For the sauce, just mix all the ingredients together, and serve aside the tomato picks.

A quick starter in just a minute.


want something really hot and spicy ??
The kerala style pepper chicken really makes up for the mild and suttle flavour of the red Rice pulav.

You need:
Chicken, cut to medium size pieces - 2 kg

To marinate
4 to 5 tsp - Pepper chicken masala (available in Indian supermarkets)
Ginger garlic paste - 1 tbsp
Salt to taste

Other ingredients
Onions , chopped - 3 cups
Pepper chicken masala - 3 tbsp
Chille powder, Coriander powder - 2-3 tsp
Turmeric powder - 1 tsp
Black pepper powder - 1-2 tbsp
Green chilies, chopped - 4-5
Ginger - 1 inch piece
Garlic - 6-7 cloves
4 to 5 sprigs - Curry leaves
How to prepare Kerala Pepper chicken

Marinate chicken for 30 mins in a marinade made with mixing the said ingredients with little water ,ensure that chicken pieces get well covered in all sides with the marinade mixture.

How to :

Heat a pan & put marinated chicken into the pan ,no need to add water ,close with a lide & cook ,as chicken will leave water it will get cooked in that water ,cook till chicken turns tender ,drain the water from the cooked chicken & keep aside the chicken pieces .

Take another pan & heat oil.
When the oil is hot add in mustard seeds, ginger, garlic, green chillie, and chopped onions.
Fry till it turn brown, add the masalas and stir on low flame till the raw smells leaves and oil separates.
Now add the cooked chicken pieces , pepper powder and  mix well with the masala . Once the gravy is well blended,
Remove from heat & off the stove .
Garnish this black pepper chicken with coriander leaves.


Enjoy  !!!